Windows Terminal became generally available in January this year. It supposes to replace the existing command line and offers many curious features, like: multiple tabs (for quick quickly switching between Windows Command Prompt, PowerShell, Azure CLI, Linux, etc.), create custom key bindings (shortcut keys for opening or closing tabs, copy+paste, etc.), uses the search feature, and custom themes and many more. It fits very well if you have WSL installed (this is something I talked about in my previous article here):
Yes, you can still run your Linux distribution in Windows by simply executing the 'wsl' command in the command line, although, as mentioned, the new Terminal offers lots of features that never existed in cmd. Of course, upon the installation of the Terminal from Microsoft Store, it won't be as pretty as the one you see on the screenshot above. For that, you have to apply some more effort.
Some steps I'll be describing here are also applicable for the Power Shell and the standard command prompt you can open in the separate tabs, but the bigger portion of the topic will be devoted to a Linux command prompt and, specifically, ZSH as a default shell for it and its beautification.
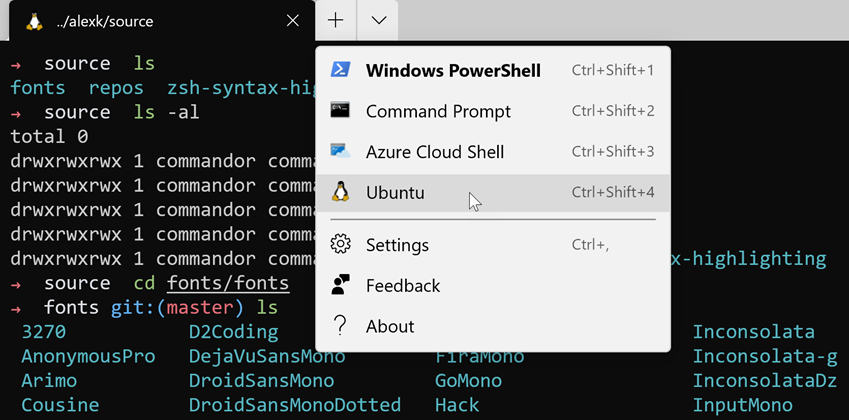
To get started, open up your Ubuntu console in the Terminal (it'll appear in the drop-down shown on the screenshot once you install WSL). Fulfill the prerequisites:
sudo apt update
sudo apt install git zsh -y
Next, install Oh My ZSH:
sh -c "$(curl -fsSL https://raw.githubusercontent.com/ohmyzsh/ohmyzsh/master/tools/install.sh)"
Configuring ZSH, we need to make sure it is executed every time you run Bash on Ubuntu ( if not done, you would need to type 'zsh' every time). To achieve this, make the following update in the '.bashrc' file with nano: nano ~/.bashrc (make sure you insert this after the first comment lines in that file).
Now, you're good to start configuring the ZSH. Open the config file with nano and change the default theme (nano ~/.zshrc): ZSH_THEME="edvardm"
Once Terminal is restarted, you'll see the changes immediately. To make Terminal looking even prettier, we need to install Powerline fonts (they'll be handy if you decide to change the theme to something fancier). Get the Git repository cloned in Windows: git clone https://github.com/powerline/fonts.git
Go inside the fonts directory and execute the following line in PowerShell: '.\install.ps1'. In the Terminal settings (drop-down meu or 'Ctrl+,'), find the profiles section and specifically the one related to your Linux installation (Ubuntu in my case):
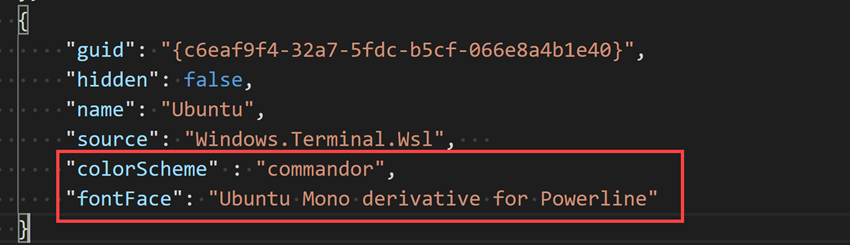
I use the 'Ubuntu Mono derivative for Powerline' font with a customized color scheme. Here's the color scheme for the Terminal look and feel you see on the very first screenshot above:
"schemes": [
        {
            "name": "commandor",
            "foreground": "#CCCCCC",
            "background": "#0C0C0C",
            "cursorColor": "#FFFFFF",
            "black": "#0C0C0C",
            "red": "#E06C75",
            "green": "#98C379",
            "yellow": "#E5C07B",
            "blue": "#61AFEF",
            "purple": "#C678DD",
            "cyan": "#56B6C2",
            "white": "#DCDFE4",
            "brightBlack": "#5A6374",
            "brightRed": "#E06C75",
            "brightGreen": "#98C379",
            "brightYellow": "#E5C07B",
            "brightBlue": "#61AFEF",
            "brightPurple": "#C678DD",
            "brightCyan": "#56B6C2",
            "brightWhite": "#DCDFE4"
        }
    ]
That might be it, but one thing irritated me a lot – the Terminal was highlighting the directories with acid green color. Fortunately, this can easily be fixed as well by implementing the following line in the .zshrc file:
LS_COLORS='ow=01;36;40'
export LS_COLORS
And finally, to conclude the configuration, I'm using the syntax highlight and auto-suggestion plugins. They both can easily be installed just by following this instruction: https://gist.github.com/dogrocker/1efb8fd9427779c827058f873b94df95 or:
- Download zsh-autosuggestions by: git clone https://github.com/zsh-users/zsh-autosuggestions.git $ZSH_CUSTOM/plugins/zsh-autosuggestions
- Download zsh-syntax-highlighting by: git clone https://github.com/zsh-users/zsh-syntax-highlighting.git $ZSH_CUSTOM/plugins/zsh-syntax-highlighting
Reflect the changes in the .zshrc file. A complete config file would look like the following:
# If you come from bash, you might have to change your $PATH.
# export PATH=$HOME/bin:/usr/local/bin:$PATH
ZSH_DISABLE_COMPFIX=true

# Path to your oh-my-zsh installation
export ZSH="/home/commandor/.oh-my-zsh"

# Remove ugly green highlight for the directories
LS_COLORS='ow=01;36;40'
export LS_COLORS

# Set name of the theme to load --- if set to "random", it will
# load a random theme each time oh-my-zsh is loaded, in which case,
# to know which specific one was loaded, run: echo $RANDOM_THEME
# See https://github.com/ohmyzsh/ohmyzsh/wiki/Themes
ZSH_THEME="edvardm"

# Which plugins would you like to load?
# Standard plugins can be found in $ZSH/plugins/
# Custom plugins may be added to $ZSH_CUSTOM/plugins/
# Example format: plugins=(rails git textmate ruby lighthouse)
# Add wisely, as too many plugins slow down shell startup.
plugins=(
  git
  docker
  npm
  bgnotify
  zsh-syntax-highlighting
  zsh-autosuggestions
  web-search
)
source $ZSH/oh-my-zsh.sh
Don't be worried about the first line (i.e., 'ZSH_DISABLE_COMPFIX=true'). It disables possible warnings that may occur after the installation of the plugins.
That's pretty much it. These days I enjoy working with the WSL in a Terminal. It allows you to access Windows files if necessary and work with other command-line tools like Azure CLI. So, migration to it for everyday use won't be an issue.
Useful links:
Oh My ZHS cheatsheet: https://github.com/ohmyzsh/ohmyzsh/wiki/Cheatsheet