As people reading my topics know, I’m writing mostly about DevOps and Cloud technologies. The most widely spread technology to orchestrate containers these days is Kubernetes, and this topic is for everyone who wants to know more about its Architecture and the way it can be deployed on-premises and in the cloud.
Let’s start with the concepts, i.e. the understanding what’s Kubernetes, how the Architecture look like and how to deploy and use it in Azure. I plan to explain the CI/CD process for Docker container and Kubernetes cluster in my next topic.
Kubernetes is an open source system for managing containerized applications across multiple hosts; providing basic mechanisms for deployment, maintenance, and scaling of applications.
Historical facts
- Kubernetes came from Google
- In 2014 it was donated to CNCF (Cloud Native Computing Foundation), i.e. became open-source under Apache 2.0 license. Some experts think it was a turnaround point in Kubernetes development.
- It’s written in Go/Golang
- It’s built upon cluster management system called Borg and combined with the best practices and ideas from the community
- Sometimes people refer to another technology related to Kubernetes, called Omega, which is an enhanced scheduling system for large compute clusters. Omega is considered one of the proprietary ‘ancestors’ of Kubernetes, along with Borg
- Version 1.0 saw the world in 2015
- Kubernetes, from Greek: κυβερνήτης (kyvernítis) – the person who steers the ship (pay attention to the logo 😊)
- Sometimes, you would see the abbreviation K8S which is ‘Kubernetes’ in short (eight characters in between K and S are replaced with the number). I’ll be using it from now on instead full word, or just ‘K8 cluster’.
What & why?
It’s amazing what we need to learn every year in order to keep up with the insane pace of technologies development. It’s either new programming language, software delivery model (i.e. cloud) or system, like Kubernetes. We treat our data center as a computer. These days, creating a new virtual machine is a mouse click, cabling/networking is just a matter of configuration inside the program. Virtualization went much further than just creating VMs on top of a hypervisor. In comparison to the classical hypervisors where your VMs shares the same hardware, container management platforms like K8 share the same operating system (OS), so, this is a different kind of virtualization. This course does not assume an introduction to the containers as there are many great materials over the internet. Instead, it focuses on the container management systems like Kubernetes. If you have a bunch of containers with your applications in them, everything you need to do is to say ‘hey Kubernetes, run these for me!’ and it does all the heavy lifting (running containers, scaling, watching their performance etc.). Everything you need is just a manifest that is treated by K8 as ‘operating instructions’ for your containers. Kubernetes is a fast-moving technology. More or and more organizations are adopting it to manage thousands or even millions of containers. It is very important to grasp the basics to understand how it works and the cluster’s main capabilities. As always, in the realm of IT, you snooze, you lose. Let’s proceed to the next chapter that explains the Architecture of this beautiful system.
Birdseye view
Kubernetes is an orchestration platform. It makes separate services work together in one unite landscape with the right networking between them. In the high-level representation, Kubernetes may manage from one to many nodes (aka Minions) that host multiple pods (i.e. Docker containers) with our services and applications in them.
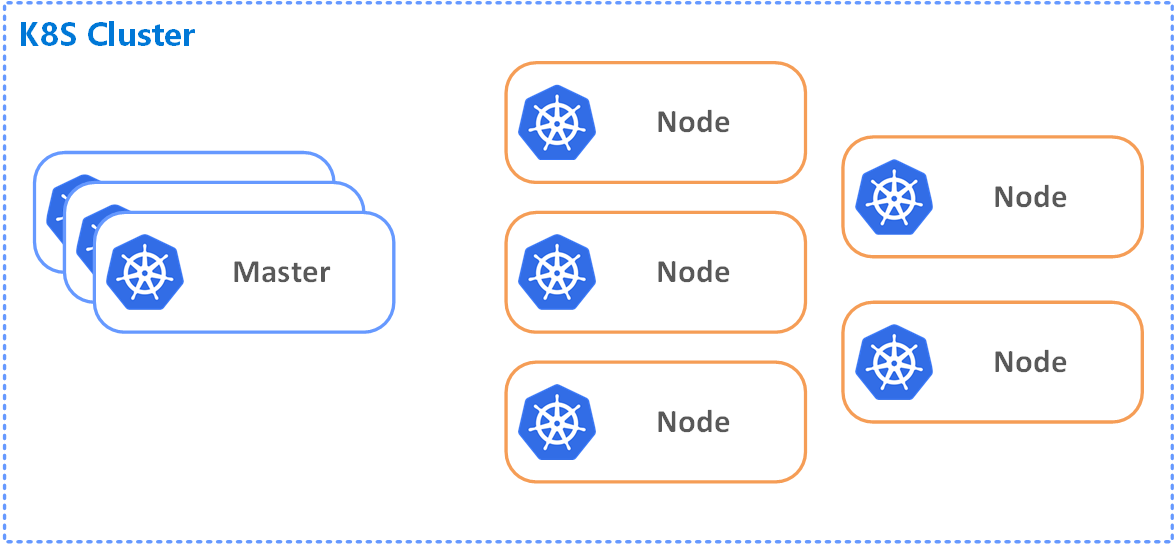
Figure 1. K8S Cluster - HL view
Just like in many similar orchestration platforms, Master (or control plane) node is ‘in charge’ in the cluster. It does a lot of different tasks, including:
- Monitoring the cluster
- Making the changes
- Scheduling work
- Responding to events etc.
and the nodes are the instances that do the work (Figure 1. K8S Cluster - HL view). Talking in terms of the cloud, the master node and the nodes orchestrated by it are just a bunch of virtual machines that run your Docker images in Pods. The Nodes with Pods are defining your deployment environment that has networking, routing, role-based access control, etc. The image worth a thousand words:
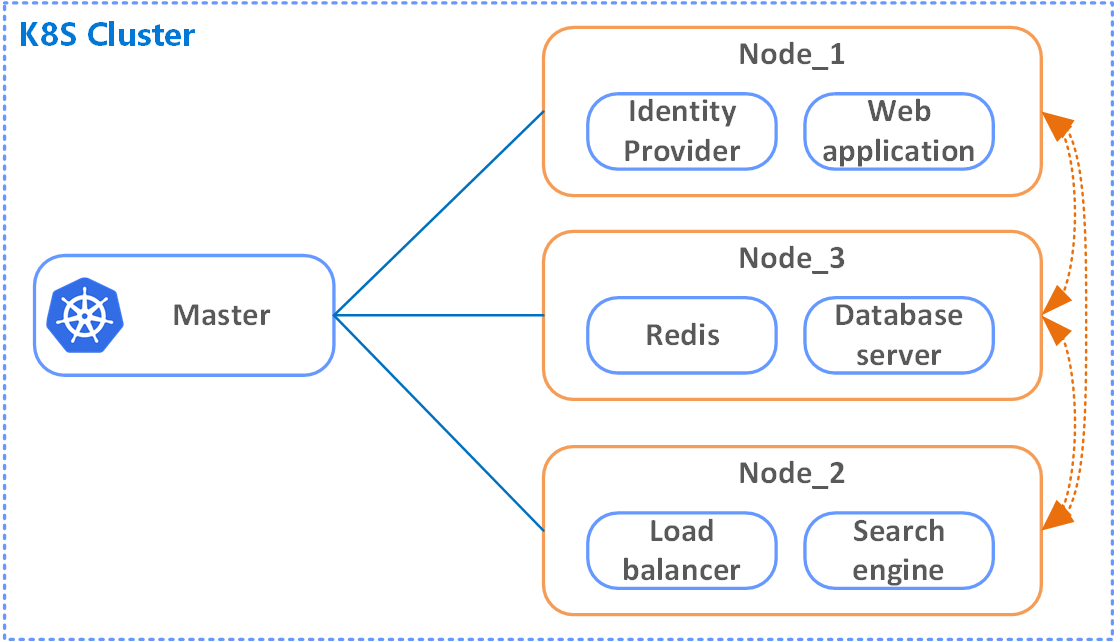
Figure 2. Nodes with Pods managed by the Master
Having the picture above in mind, the process overall look like the following:
- Develop code and have it right
- Containerize it (build a Docker image)
- Define an object called ‘deployment’ (by creating a manifest in a yaml file)
- Send it to the master node in K8S cluster so it can deploy it in a Pod inside the Node.
Kubernetes master node is quite a machinery. It provides the cluster’s “control plane”. Generally, it is platform-agnostic, meaning, it’s not opinionated regarding the OS and the environment. Underneath it can be a bare metal, a virtual machine, cloud or open-stack. Master components can be run on any machine in the cluster. However, for simplicity, set up scripts typically start all master components on the same machine, and do not run user containers on this machine. The master comprises of the following components:
- kube-apiserver
- etcd
- kube-scheduler
- controller-manager
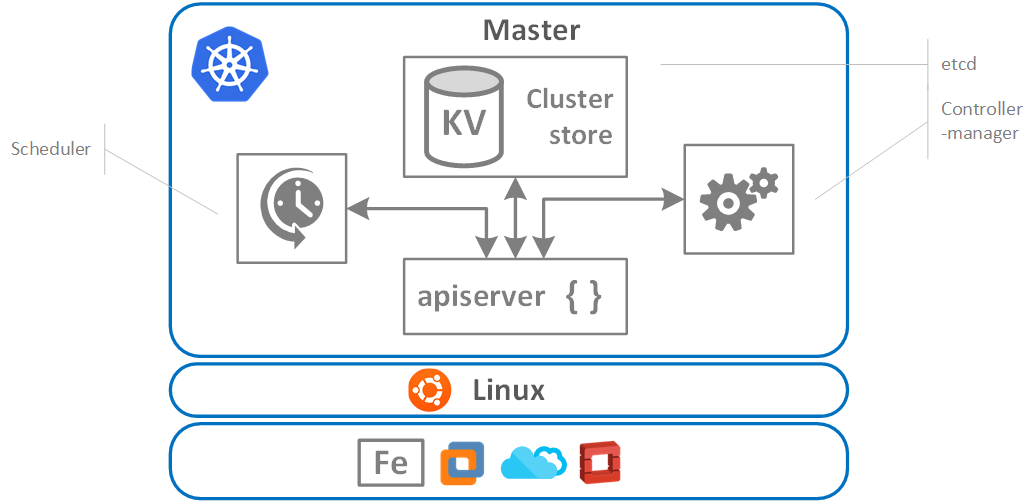
Figure 3. K8 Master node Architecture
kube-apiserver
Component on the master that exposes the Kubernetes API. It is the front-end for the Kubernetes control plane (in fact, this is the only component in Master we should talk to). It exposes the RESTful API and consumes JSON. The manifest (*.yaml file we were talking about before) is sent to apiserver, it verifies it and attempts to deploy it to the cluster
etcd
Well, if the apiserver is the brains of the cluster, then the store is its memory. Consistent and highly-available key value store used as Kubernetes’ backing store for all cluster data (meaning that the config and the state of the cluster are stored here). It uses “etcd”, an opensource distributed key-value store. It serves as the “source of truth” for the cluster. More info about it can be found on the relevant page in GitHub. Make sure you have a solid backup plan for etcd’s data for your Kubernetes cluster
kube-scheduler
Component on the master that watches newly created pods that have no node assigned and selects a node for them to run on (i.e. assigns work to nodes) and also does a ton of other things:
- affinity/anti-affinity
- constraints
- resource management
kube-controller-manager
Component on the master that runs controllers. Logically, each controller is a separate process, but to reduce complexity, they are all compiled into a single binary and run in a single process. Practically, it is a controller of the controller because it controls multiple aspects of a cluster, i.e. other controllers like:
- Node controller: responsible for noticing and responding when nodes go down
- Replication controller: responsible for maintaining the correct number of pods for every replication controller object in the system
- Endpoints controller: Populates the Endpoints object (that is, joins Services & Pods)
- Service account & token controllers: Create default accounts and API access tokens for new namespaces
It watches for changes and makes sure that the current state of a cluster matches its desired state.
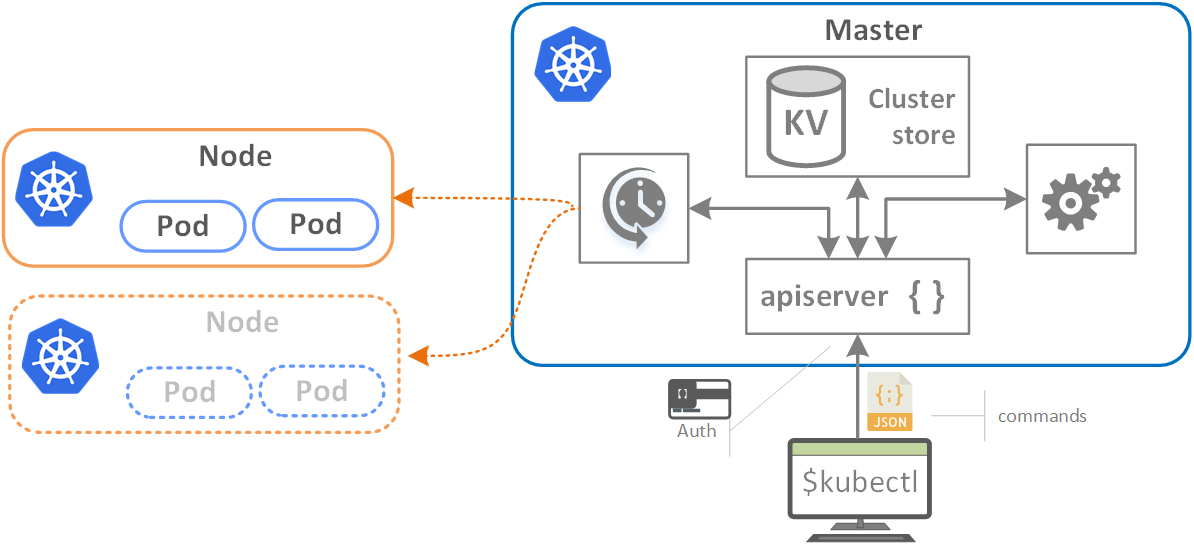
Figure 4. Pods provisioning with apiserver & scheduler
On the diagram above, commands come from the “kubectl” command-line utility. Authentication can also be jammed-in at this point. The commands are formatted as a JSON (apiserver uses RESTful APIs if you recall) and then, generally speaking, some chatting is going on between the components of the cluster. Depending on the outcome, the commands and action items make their way to Nodes (i.e. Pods are being provisioned to one or multiple nodes by the scheduler as depicted on the scheme).
Cannon fodder or talking about Pods
Now, as we understand the Architecture of the Master node, let’s talk about the Nodes. The working mechanics of the Node is much simpler; it has only a few components (see the scheme below). Nodes (formerly known as ‘minions’) are consumable, talking in terms of the K8 landscape. There is something that name that used to underline the unimportance of Nodes because if it doesn’t work well, it gonna be replaced by the Master. Well, enough about this “master-slave” paradigm, let’s see how it works.
First and definitely the most important component in Node is “Kubelet”, which is the Kubernetes agent. Maybe, it would be fair to say that Kubelet is a Node:
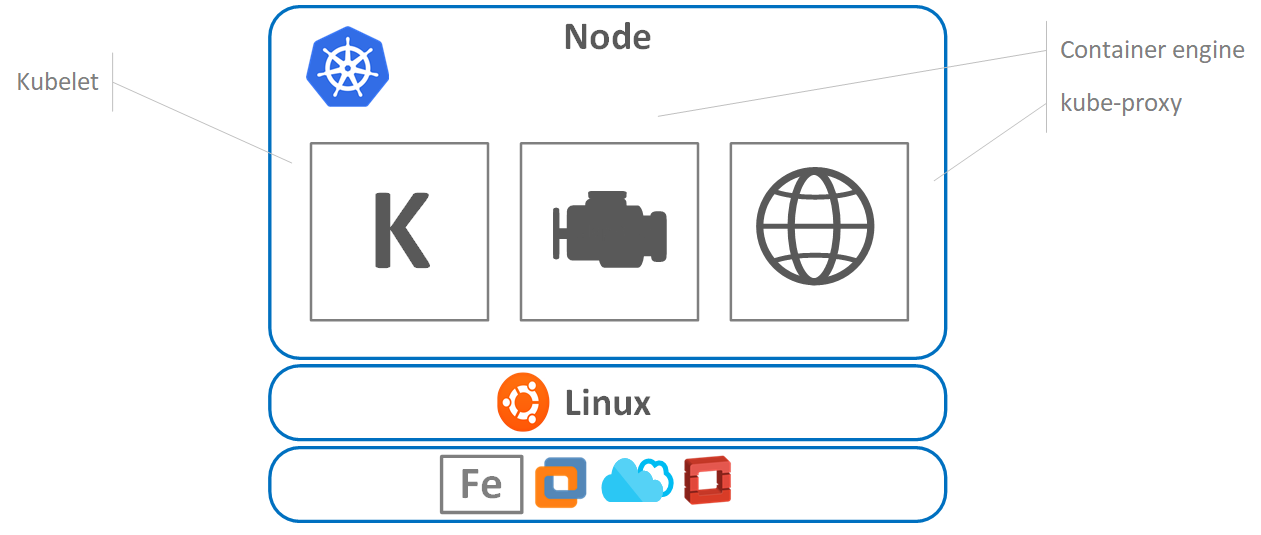
Figure 5. Kubernetes Node Architecture
The working principle is quite simple. You install it to the Linux host, it registers the host as a cluster Node and then it watches the apiserver in the Master for a work assignment. When it ‘sees’ one, it instantiates Pods and ‘reports’ back to Master. If for some reason it cannot perform the work assigned, it reports to Master and then the control plane ‘decides’ what to do next. Having this flow in mind, we can conclude that if Pod is failing, the Kubelet is not responsible for restarting/re-instantiating it, what it does instead, it simply reports back to the Master. It is good to know that port 10255 on the Node is occupied. Kubelet uses this port so it can be accessed via the endpoint for receiving the spec, health check or verifying the number of pods (/spec, /healthz and /pods endpoints are used for the purpose respectively).
As we figured already, Pods are running Docker images, and hence, Node needs the instruments to perform this operation. For this purpose, the Container Engine is used.
The Container Engine is responsible for:
- Pulling images (from the container repositories)
- Starting/stopping containers
- Normally it uses Docker as a runtime (and as an alternative rkt from Core OS could be used, so it's pluggable)
So, we can conclude that the major part of what kubelet does – it talks to container runtime. In the case of Docker, it uses native Docker API.
The last piece of a puzzle is a kube-proxy. Everything it does is network management in the node. Literally, it takes case of the Pod’s IP addresses (all containers in a Pod share the same IP). It means that if you want to reach a single Pod in the Node, you should use ports.
Desired state and declarative model
A Kubernetes object is a “record of intent”–once you create the object, the Kubernetes system will constantly work to ensure that object exists. By creating an object, you’re effectively telling the Kubernetes system what you want your cluster’s workload to look like; this is your cluster’s desired state. So, as per “Figure 4. Pods provisioning with apiserver & scheduler”, we send a manifest to Kubernetes stating how our environment should look like (desired state). It’s up to Kubernetes to make it available. The spec is not precise. You can draw the parallels dreaming about refurbishing your kitchen and the appliances and hardware you want to have in there (desired state) and hire a contractor (Kubernetes) to achieve the goal (you don’t need to explain any further, i.e. what materials to use or what lighting fits best) as the ‘expert’ knows best. What you want though is to get a ‘thing’. 😊 In the world of Kubernetes, it means that it does all the hard work of pulling images from the repo, starting containers, doing networking, running reconciliation etc. We never interact with Kubernetes imperatively, we only give it a declarative instruction (manifest) it starts working with. The way it works is well demonstrated on the following scheme:
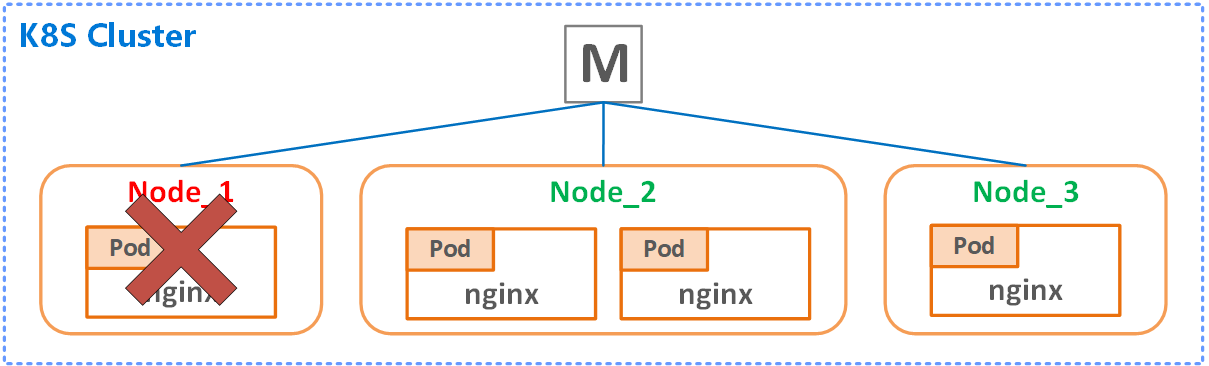
Figure 6. K8 Desired state management
If we declared in our manifest, we want three nginx instances (desired state), Kubernetes will provision that according to the request. Although, if one of the Nodes go down (as depicted), our desired state won’t be equal to three. In this case, K8 will do its best to provision another Pod on the survived Node to satisfy demand. Everybody’s happy again. The power of ‘desired state’ concept is extremely powerful. It is hard to overestimate it when you think of building modern HA/stress-resistant systems.
Pods
The atomic unit of deployment in VMWare is the virtual machine. For Docker, it is a container. For Kubernetes, as we discussed before, it’s a Pod. All containers in Kubernetes run in Pods. Container without Pod in Kubernetes is a naked container, and Kubernetes has pretty strict rules on nudity 😊 Well, you’re not allowed to deploy container directly to K8. From the top-level perspective, a Pod is just a ring-fenced environment you run the container in (sandbox). Pods provide two kinds of shared resources for their constituent containers: networking and storage. Pod has its own network stack, kernel namespace etc., and all container in a Pod share the same Pod environment and the IP (yes, you’re allowed to run multiple containers in a Pod). To be clear, the unit of scaling in the Kubernetes world is a Pod. It means that if you need to scale your app, you add more Pod replicas (not multiple containers to the same Pod). It is worth mentioning that a Pod is a disposable unit in the Kubernetes world (as we discussed earlier). They are created, disposed but never brought back to life, so no Lazarus effect here 😊 Instead, they’re re-created from scratch.
Pods are normally deployed via higher-level objects, like Replication controller (see “Figure 7. Pod deployment” below):
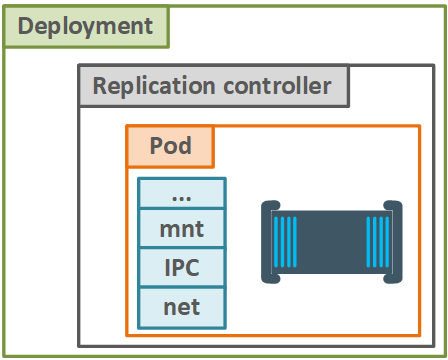
Figure 7. Pod deployment
These objects add more feature to Pods, and as you may guess, Replica controller adds more replicas for existing Pod definition. Then it is making sure that the required number of replicas is running.
Services
As we learned, Kubernetes Pods are mortal. They are born, and when they die, they are not resurrected. ReplicaSets, in particular, create and destroy Pods dynamically (e.g. when scaling out or in). While each Pod gets its own IP address, even those IP addresses cannot be relied upon to be stable over time. This leads to a problem: if some set of Pods (let’s call them backends) provides functionality to other Pods (let’s call them frontends) inside the Kubernetes cluster, how do those frontends find out and keep track of which backends are in that set? How you can rely on the Pod if every time it’s re-created, it gets new IP? This is where Services come into play.
A Kubernetes Service is an abstraction which defines a logical set of Pods and a policy by which to access them - sometimes called a micro-service. The set of Pods targeted by a Service is (usually) determined by a Label Selector (see below for why you might want a Service without a selector).
All the new Pods (i.e. their IPs) are getting added to the Service. Service’s IP and DNS remains unchanged, so the Pods (Front-end on the scheme below) always know how to connect to the other Pods containing the backend side of the application (database), see “Figure 8. Service proxy” for more details. If we add more Pods into the landscape, the Service will be load-balancing over all of them. Once the new version of a Pod is introduced, it will be provisioned right away, the IP updates at a Service level and the old Pods will be replaced one by one with the new version of the application. So, that’s the job of the Service – a higher level abstraction for multiple Pods, so they connect to each other (and they provide load balancing 😉). Although, internally, the way Pod belong to a Service via labels. The power of labels is well-known. They are widely used in GCP infrastructure for the networking (i.e. this is how WAF rules are being applied to the target VMs).
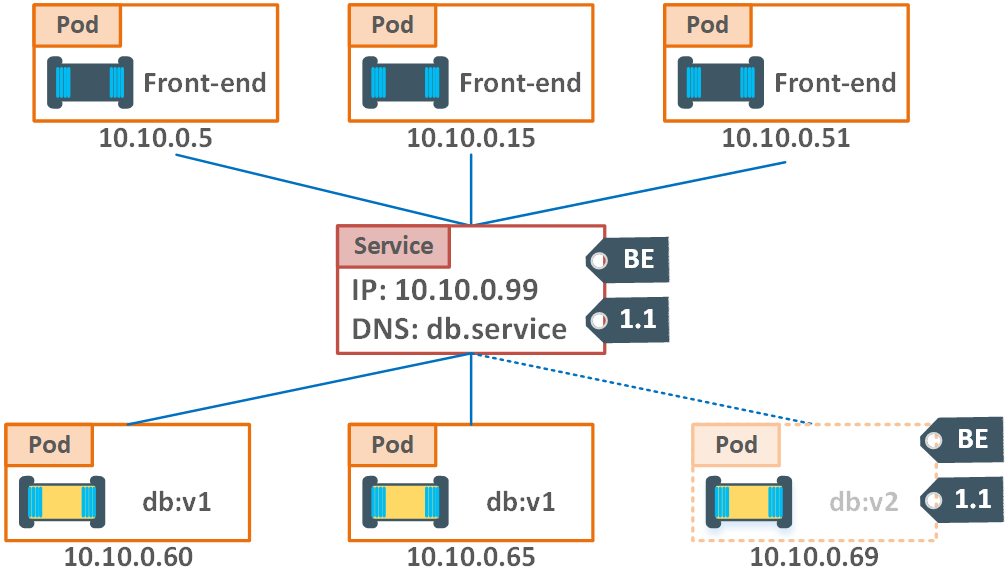
Figure 8. Service proxy
Having this scheme in mind, we can come to the conclusion that Services only load-balance traffic among the Pods with identical labels. When we have a new software update, the version’s label is getting changed, and the Pods are being re-created and replaced. The traffic is normally managed by the Service considering one or a combination of “static” labels (like “BE” in our case, or the environment acronym etc.). The takeaway from this chapter would be the next:
- Service only sends traffic to healthy Pods
- You can configure session affinity through *.yaml file
- You can point things outside the cluster
- It provides random load-balancing (DNS round-robin is also supported and can be turned on)
- Uses TCP by default (however UDP is fully supported as well)
- Service is a stable way to direct network traffic to the relevant Pods (and maintain DNS)
Deployments
A Deployment controller provides declarative updates for Pods and ReplicaSets. You describe the desired state in a Deployment object, and the Deployment controller changes the actual state to the desired state at a controlled rate. You can define Deployments to create new ReplicaSets or to remove existing Deployments and adopt all their resources with new Deployments. This is all gets back to a desired state configuration concept. Kubernetes does all the heavy lifting for you, so no sweat, no midnight calls, if the Node or Pod is down, K8S performs all the required steps to get it back until the desired state is reached. It also echoes back to the conceptual difference between imperative vs declarative programming model. Just to be sure you’re good with the jargon, ‘imperative’ means defining a bunch of steps the program should perform, hoping it is gonna be fine and the instructions are precise enough. On the other hand, ‘declarative’ means ‘I want to get you to such and such state, go and do that!’. In our manifest, we only define the state of the desired configuration and Kubernetes does the rest. The beauty of this approach is that:
- It is versioned (we’ve got and maintained our infrastructure as code, or IaaC)
- It’s self-documenting and well understood
- It’s reusable: spec-once, deploy-many
- Simple rolling updated and roll-back procedures (it makes it possible to do ‘blue-green’ deployment or ‘canary releases’).
All these qualities are the gold standard for any DevOps engineer.
Quiz:
- What are the main objects in K8S deployment? Enumerate all of them and explain their role in the entire picture
- What format is used for developing Kubernetes manifests? Why?
- Kubernetes allows you to manage container clusters in multiple cloud providers. True/False?
- In Kubernetes, what does "Pod" refer to?
Kubernetes installation
Talking about installing Kubernetes, it is important to understand where you want it. There are a wide variety of options, such as Minikube, Cloud providers, Manual installation on virtual machines or bare metal (i.e. hypervisor controlled by you), talking of which I like to use Google-fashioned diagrams to depict the complexity:

Figure 9. Kubernetes installation options
For the Kubernetes installation, let’s jump straight to the manual installation option from which you can learn the most. There are many ways you can install Kubernetes, and the one we’ll follow is through ‘kubeadm’. For the purpose, we need three VMs. It doesn’t really matter would it be your favourite cloud environment or VMWare installed locally. I’d offer to start with three instances from which one would be the Master and the rest two the Nodes in our cluster. The VMs deployment is not covered in this topic as this operation considered to be a straightforward operation. Although, you have to follow the next pre-requisites:
- VM image to use would be Ubuntu Server 16.04. Here is the link to an image for VMWare (local) deployment
- Container engine: Docker (do not pre-install it)
- If you install in the cloud, make sure all three VMs have static IPs
- The following utils/component will be installed along the way: kubeadm, kubelet, kubectl and CNI
Just to re-iterate on what we already know (in terms of theses pre-requisites):
- Docker is a container runtime (yes, as simple as that), if we’re not talking about the Swarm 😊
- kubectl – K8s client (we gonna be using through command line)
- kubeadm is the tool we gonna use to build our cluster
- kubelet is a Kubernetes Node agent
- and finally, CNI is installing support for CNI (Container Network Interface) networking, i.e. an overlay network for the Pods and Nodes
The managed instance is much simpler. All three cloud providers (and I’m talking about Azure, AWS and GCP) have their own managed offering. I will show an example of a K8S deployment in Azure later down the road.
The first step, we need to make sure we’re getting the packages from the right repo. You would require root permissions to execute these commands:
sudo su -

apt-get update & apt-get install -y apt-transport-https

curl -s https://packages.cloud.google.com/apt/doc/apt-key.gpg | apt-key add -

cat <<EOF >/etc/apt/sources.list.d/kubernetes.list

deb http://apt.kubernetes.io/ kubernetes-xenial main

EOF

apt-get update
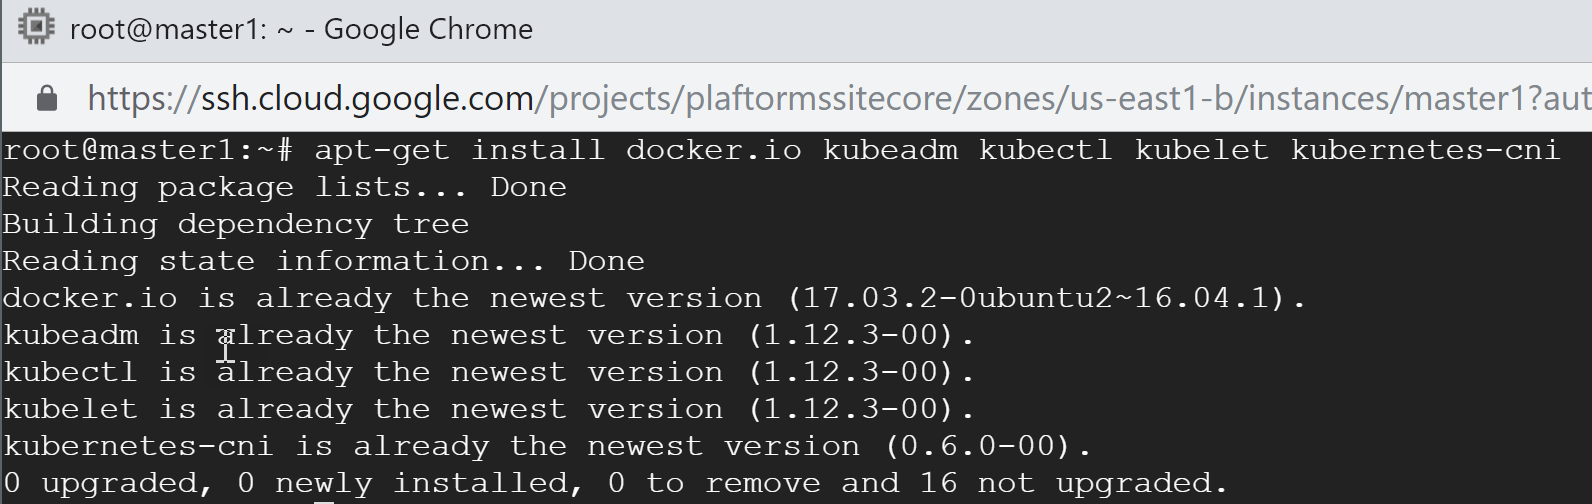
This bit is a bit of an OS-specific (as I’m using amd64 xenial image built on 2018-11-14 in GCP). The rest is less. Now let’s install all those packages we were talking about. You can do this with one command:
apt-get install docker.io kubeadm kubectl kubelet kubernetes-cni
Now, as we’ve done with pre-requisites we can move forward. Remember that you need to install the same to every Node in a cluster.
The best way to see versions is to run the same command again:
The best way to initialize K8S cluster is to use the following command:
kubeadm init
Next, after pulling all the necessary images it’ll ask you to execute several commands as a regular user:

So, to proceed hit ‘exit’ (to exit root mode) and proceed with the above commands:
exit

mkdir -p $HOME/.kube

sudo cp -i /etc/kubernetes/admin.conf $HOME/.kube/config

sudo chown $(id -u):$(id -g) $HOME/.kube/config

after this we’re ready to use ‘kubectl’:

kubectl get nodes

Even though we can see a node, notice the status ‘NotReady’. Let’s take a look at what’s happening on the system level and get system pods:
kubectl get pods --all-namespaces
and here we can see the reason (circled in red):
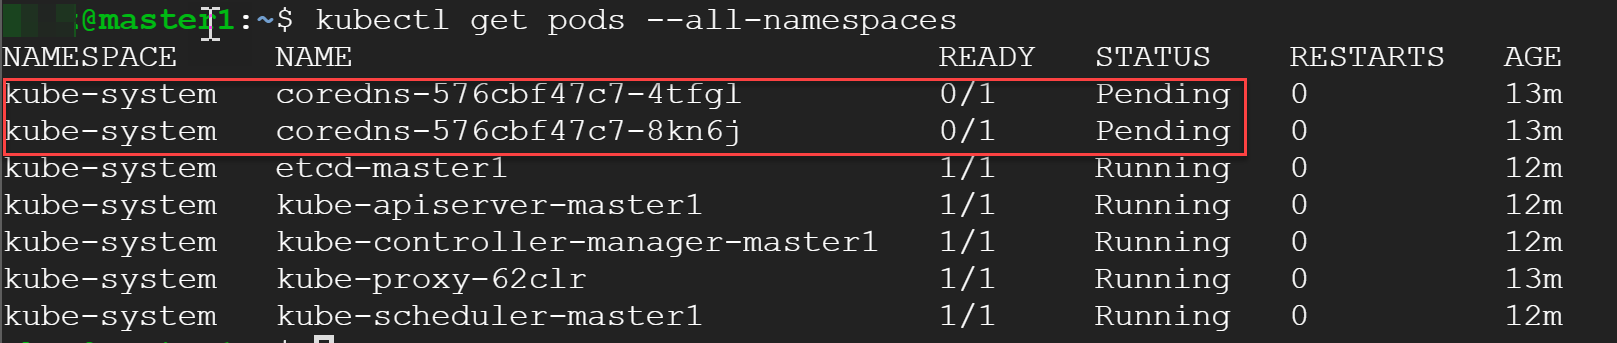
What we’re having here is zero in DNS pods, and they won’t come up at all until we create a Pod network. We gonna go with a multi-host overlay from ‘Weave’. Here is the command to install it:
kubectl apply -f https://cloud.weave.works/k8s/net?k8s-version=$(kubectl version | base64 | tr -d '\n')
After executing this command, the status of your node should to Ready (and if you check DNS pods status, you’ll see them up and running as well). Looks good!
Now, subordinating the rest two machines to the Master would be a piece of cake. Earlier, when you were asked to run some commands as a regular user, Kubernetes has also spit out a join token just a bit below in the console:

The picture I’m having in my cloud console is the following (I assume you have something similar locally or in the cloud):
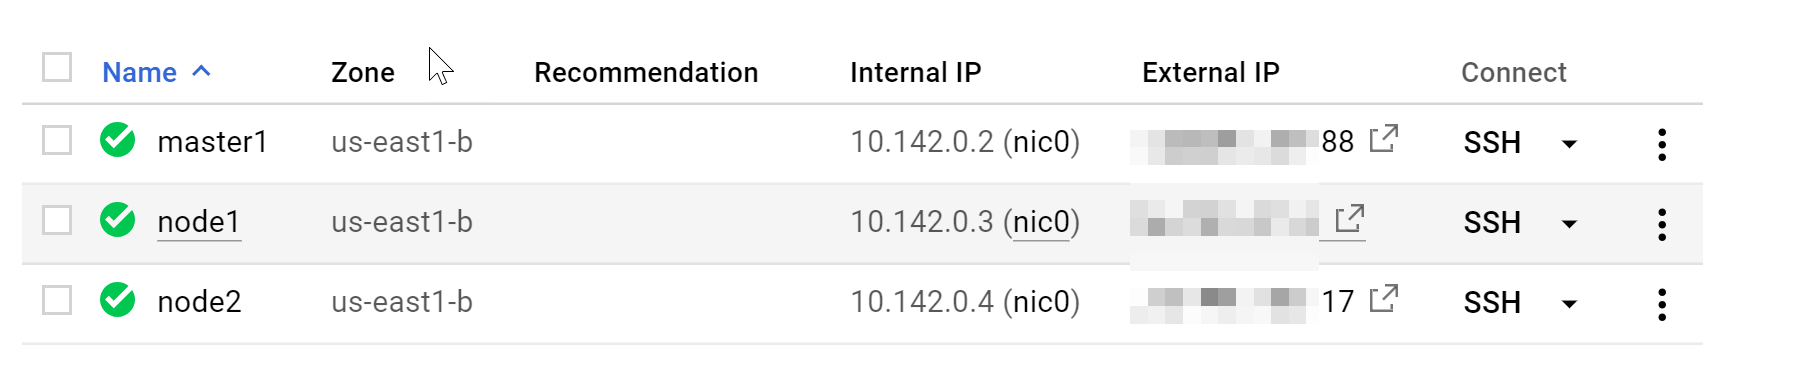
I’ve chosen GCP for this little experiment because spinning up all three nodes took less than 2min and you can access all of them right away by from SSH console. Now, let’s join ‘node1’ and ‘node2’ to the cluster. Make sure all the pre-requisites we were talking about above are installed (they’re identical for all three machines).
Well, after executing ‘join’ command for every Node, you’ll see the following message:

Couldn’t be simpler! Check your Master, you should now see these two in the list:
kubectl get nodes
You now have 3-Nodes K8S cluster but be aware that this is a zero HA cluster.
If you somehow ended up with a non-working cluster, you can always start over following the instruction. To reset the config, simply execute the following command on the master node:
kubeadm reset
Kubernetes installation using Azure managed service
As promised, the next and final step in this topic would be a Kubernetes installation in Azure managed service (Azure Kubernetes Services, AKS). I assume you already have MS Azure account. If not, you can sign-up through MS Live and get a considerably generous spending quota to play with Azure services (through https://my.visualstudio.com), use your Developer benefits.
Assuming you already have Azure CLI installed (or updated) on your PC/laptop, the first step is to log in:
az login

# let’s check if we use the right account (if you have many)

az account show

# if not, list all your accounts

az account list

# set the right one using this command

az account set --subscription <subscription id>
Next, we need a resource group that will unite all our Kubernetes Resources logically:
az group create --name K8_Cluster_RG --location eastus
Now, we need an ACR (Azure Container Registry) to store our Docker container images. We’ll be using it later on:
az acr create --resource-group K8_Cluster_RG --name K8Repo --sku Basic
ACR’s name must be unique. You can login to your ACR to make sure it’s working. Make sure that Docker is running locally before executing this command:
az acr login --name K8Repo
The indication of the successful operation must be the message ‘Login succeed’.
To allow AKS cluster interact with other Azure resources, an Azure Active Directory service principal is used. Let’s create one:
az ad sp create-for-rbac --skip-assignment
To access images stored in ACR, you must grant the AKS service principal the correct rights to pull images from ACR:
az acr show --resource-group K8_Cluster_RG --name K8Repo --query "id" --output tsv
To grant the correct access for the AKS cluster to use images stored in ACR, create a role assignment using Azure CLI:
az role assignment create --assignee <appId> --scope <acrId> --role Reader
Be aware that <acrId> is not just an ACR name but the full Resource address received in the previous step.
Now we can provision a K8S cluster:
az aks create --resource-group K8_Cluster_RG --name "K8-Cluster" --node-count 2 --service-principal <your SP id> --client-secret <your SP pwd> --generate-ssh-keys
Once command execution is complete, you’ll see two services appeared in the new resource group:

However, that’s not everything, if you take a look at “All resources” in your subscription you’ll notice that another resource group was created:
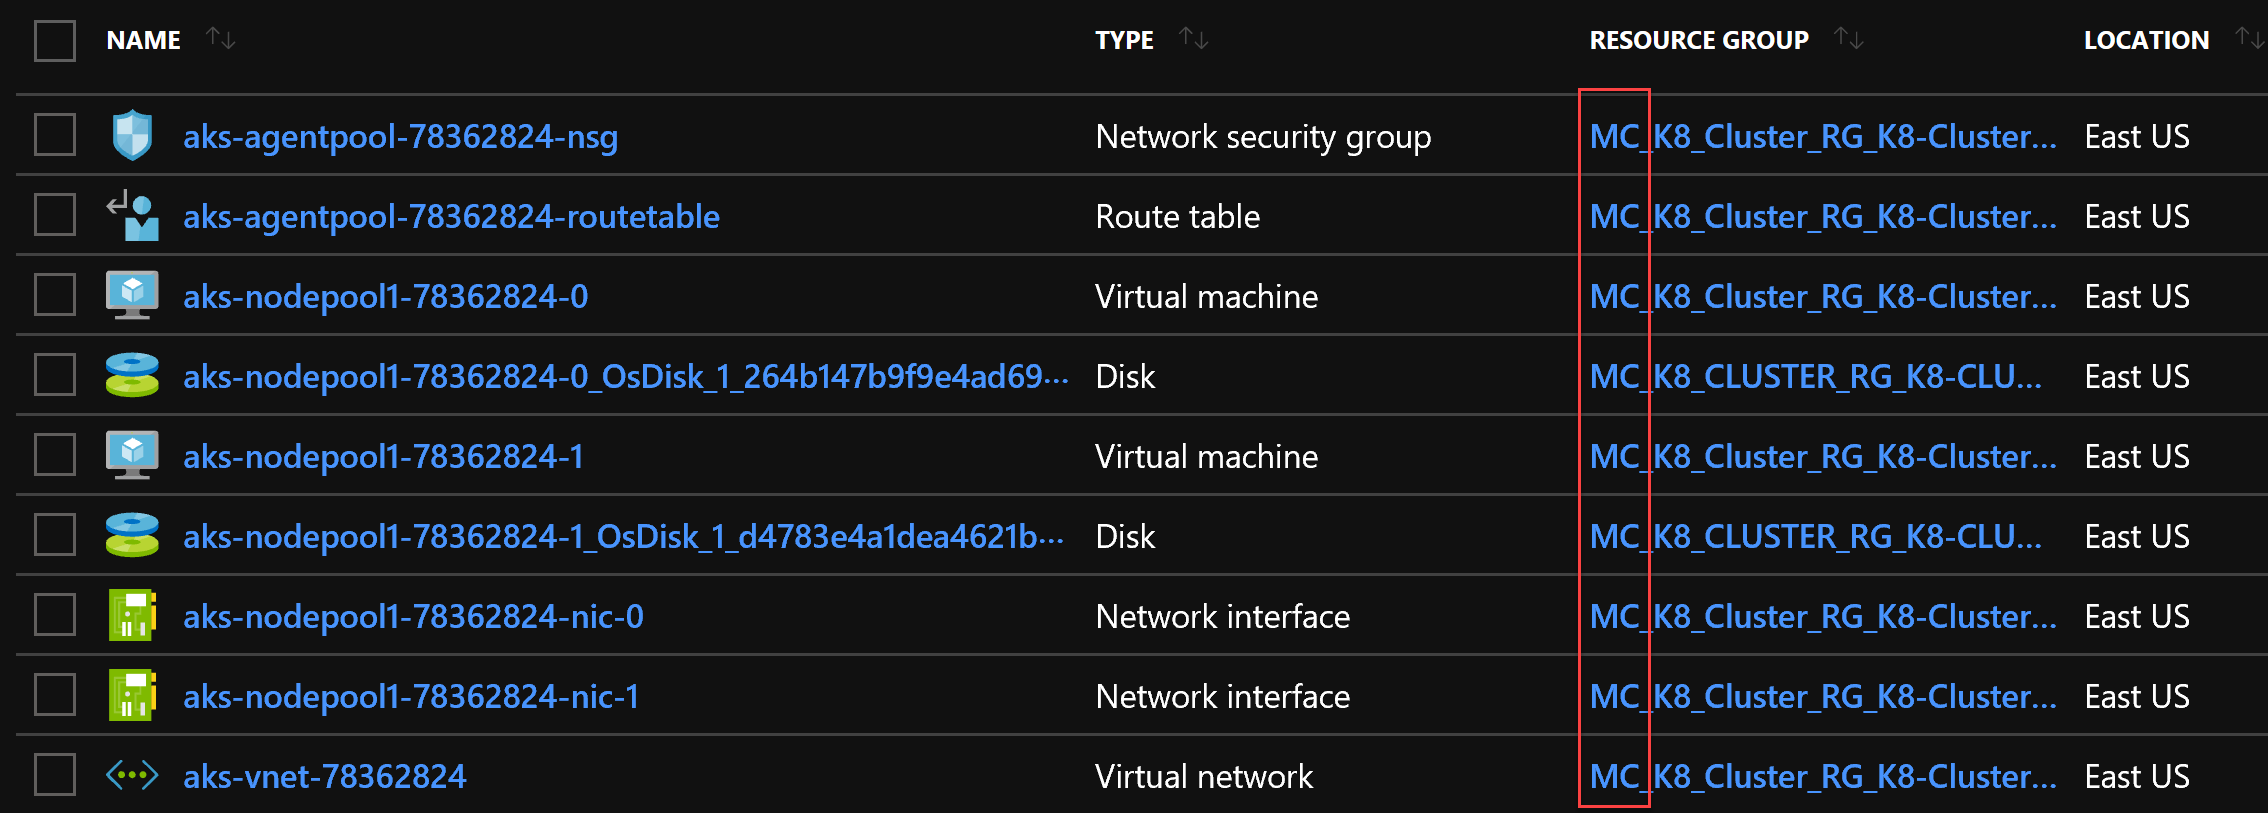
The RG prefixes the one we have created earlies with ‘MC_’. In the command line argument, we requested 2 nodes and we can clearly see them here (virtual machines), assigned to an Availability Set and connected to a Virtual Network through their network interfaces. Master is hidden and managed by Azure internally. Well, the Master is our K8 Service we have created, to be precise.
Let’s cook something. To demonstrate the infrastructure is working properly we’ll deploy Nginx webserver to one of the nodes. In DevOps, deploying Nginx has become an analogue of ‘Hello world’ for programmers. To have a better visibility over the process, access cluster dashboard first:
If you don’t have ‘kubectl’ installed, execute the following command:
az aks install-cli

# get credentials for your cluster

az aks get-credentials --resource-group K8_Cluster_RG --name K8-Cluster

# open K8S dashboard (the port will be tunneled to 8001)

az aks browse --resource-group K8_Cluster_RG --name K8-Cluster

# in case if you’re having any issues with the dashboard, create the following binding

kubectl create clusterrolebinding kubernetes-dashboard --clusterrole=cluster-admin --serviceaccount=kube-system:kubernetes-dashboard
Execute the following commands to deploy Nginx to the cluster:
kubectl run --image=nginx nginx-app --port=80

kubectl expose deployment nginx-app --type=LoadBalancer --name=nginx-app
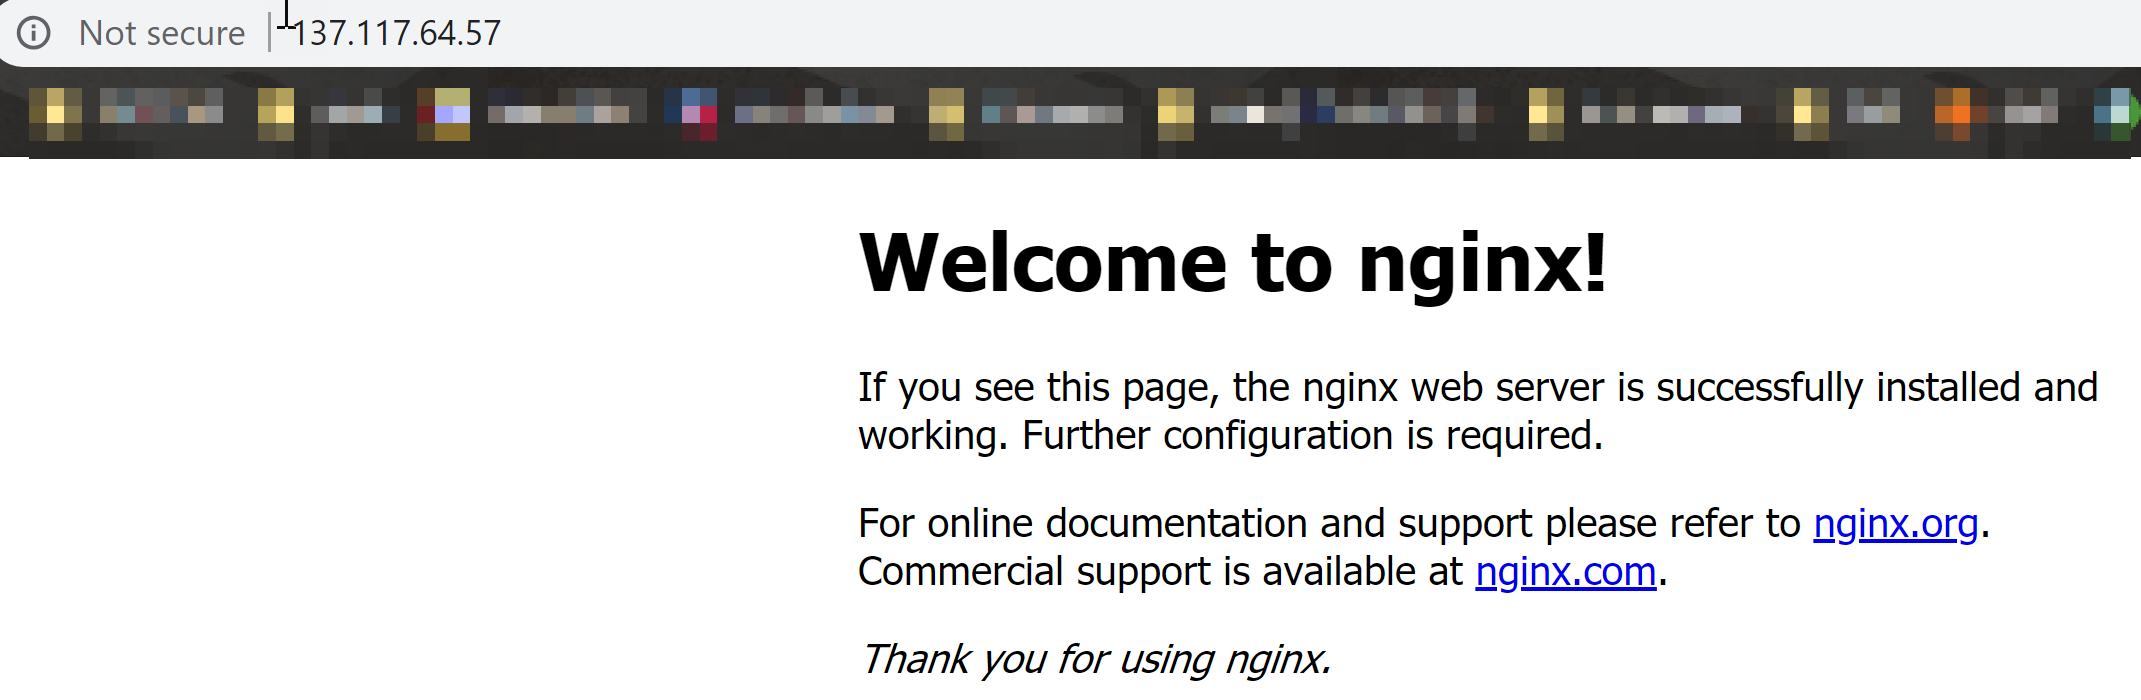
You should see now that Nginx instance is now being provisioned. Once done, the external IP would be available for viewing it:
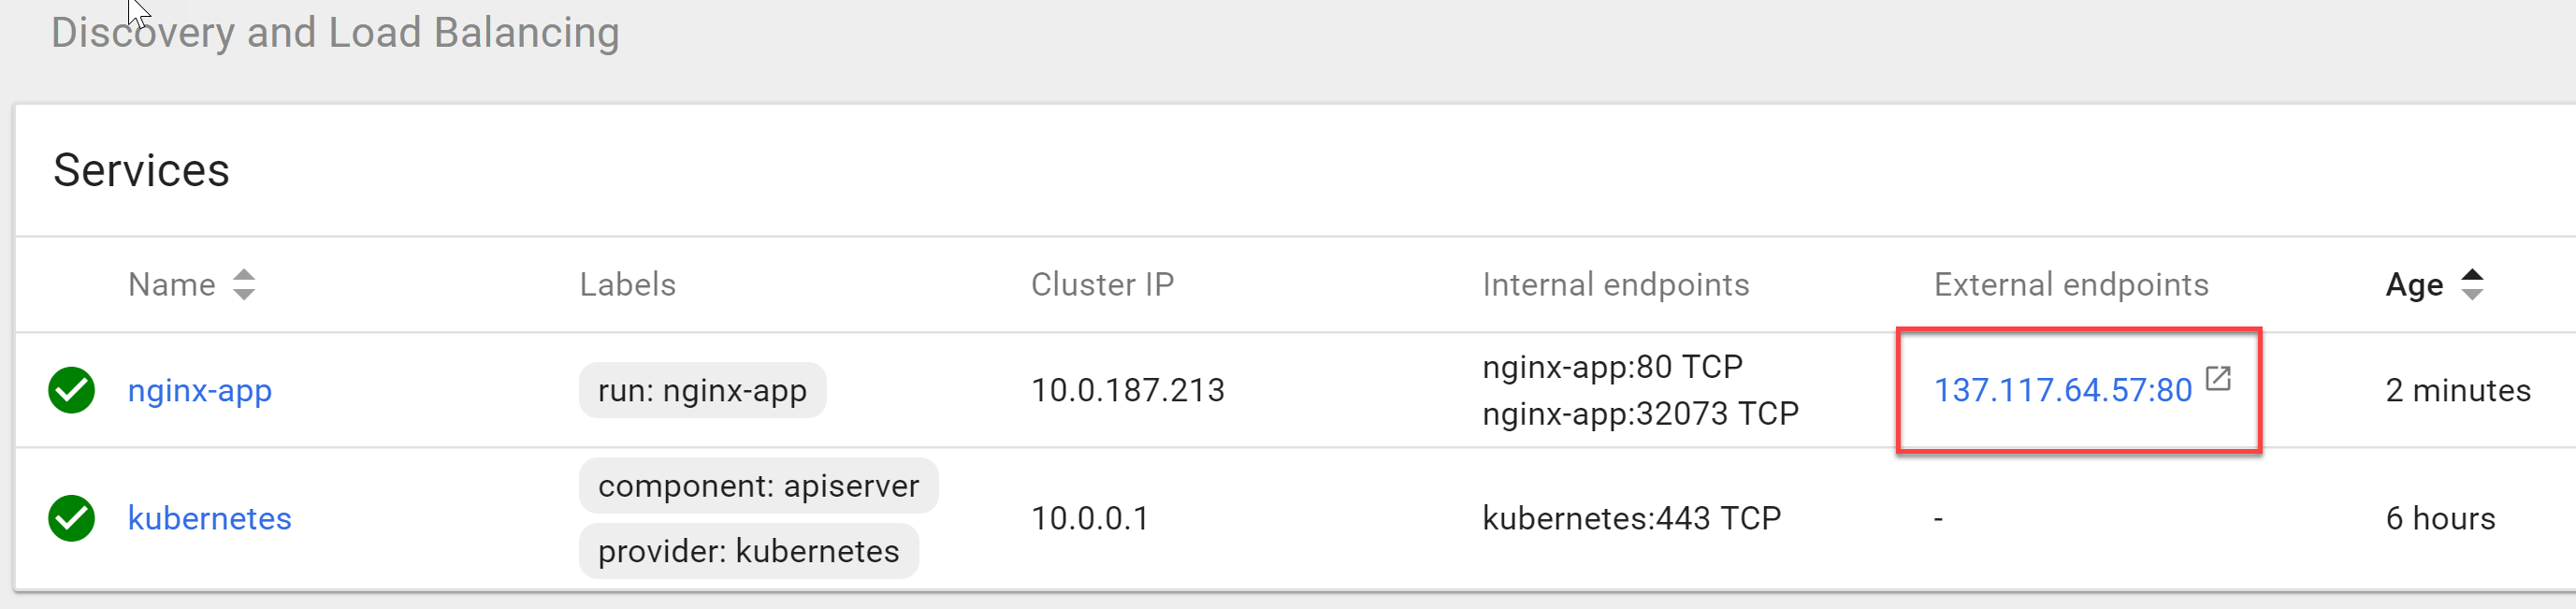
Click on the IP to see Nginx up and running:
The next topic will be dedicated to Build/Release pipeline deployment for Kubernetes cluster in Azure (using Azure DevOps), and We’ll be using provisioned ACR to store Docker images for our deployments, so don’t miss it 😉
Notes
NOTE 1: Blue-green deployment is a technique that reduces downtime and risk by running two identical production environments called Blue and Green. At any time, only one of the environments is live, with the live environment serving all production traffic. For this example, Blue is currently live, and Green is idle. As you prepare a new version of your software, deployment and the final stage of testing takes place in the environment that is not live: in this example, Green. Once you have deployed and fully tested the software in Green, you switch the router, so all incoming requests now go to Green instead of Blue. Green is now live, and Blue is idle. On the other hand, Canary deployment is a pattern for rolling out releases to a subset (small amount) of users or servers. The idea is to first deploy the change to a small subset of servers, test it, and then roll the change out to the rest of the servers. The canary deployment serves as an early warning indicator with less impact on downtime: if the canary deployment fails, the rest of the servers aren't impacted.
NOTE 2: Session affinity is a concept where the user is redirected to the same source (in our case Pod) every time you accesses the application. It is used to maintain the state in the same worker due to the fact the state is not stored in an external volume. It can be done via IP or Cookie:
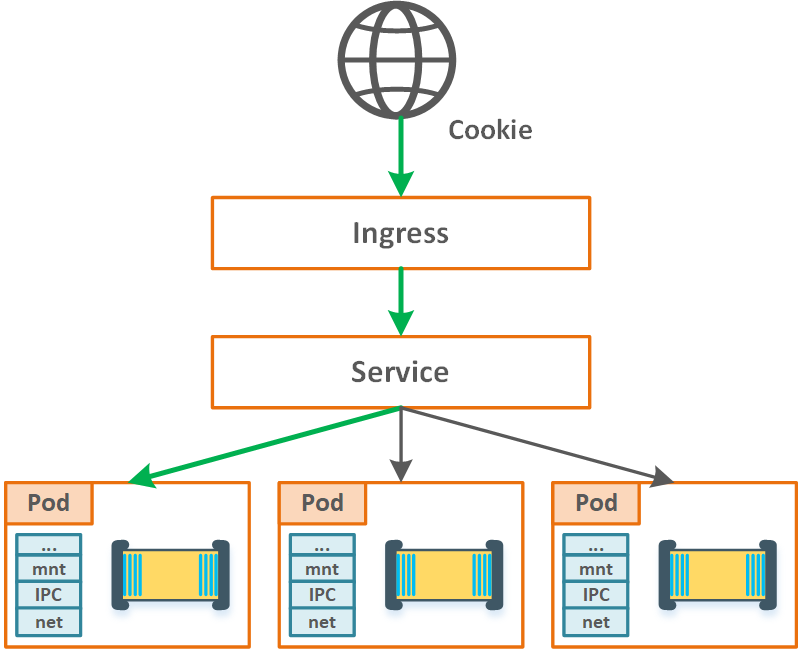
Figure 10. Session affinity (cookie-based)
Quiz answers:
- There are four main objects in K8S API:
- Pods (atomic unit of scheduling and provisioning)
- Replication Controllers (Pods scalability, desired state mgmt., etc.)
- Services (stable/reliable networking)
- Deployments (RC/rolling updates/rolling back)
- YAML and JSON. This is a convenient form to define configuration using a declarative style
- True
- A group of containers that work together
References:
Kubernetes components: https://kubernetes.io/docs/concepts/overview/components/
GitHub project link: https://github.com/kubernetes/kubernetes
Full documentation: kubernetes.io
Pluralsight course by Nigel Poulton: Getting started with Kubernetes
It has a large community you can connect with using Twitter channel: @kubernetesio or public Slack channel: slack.k8s.io