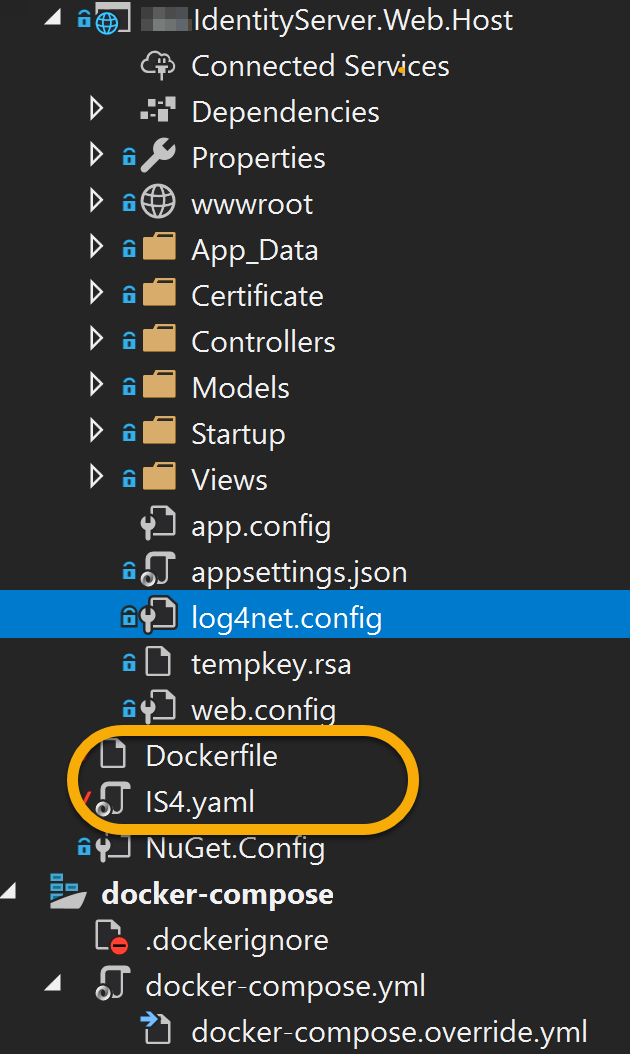
Continuing the series about Kubernetes, this time I’d like to talk more about the applied approach using this platform. This article demonstrates even more how Dev and Ops are tied together. Everything related to K8s deployments is interesting, and this time, the issue I was facing was quite unusual. I had to deploy Identity Server image to three different environments (DEV/QA/UAT), which is classics, although, every instance has its own database and connection string for the app had to be different. We’re using .NET Core as our main framework and Identity Server 4 (IS4) as a middleware configured respectively in the solution. The very first question you may ask in this case, how’d you suppose to substitute the connection string if it's baked-in the Docker image during the build? There are two files in our solution critical for the successful deployment to K8s cluster: Dockerfile and *.yaml file which is the deployment manifest for Kubernetes master we were talking about in the previous topic.
When you build a Docker image, all the solution files composed into the container over the runtime you select as a base (“microsoft/dotnet:2.1-aspnetcore-runtime” in our case). I won’t be covering Dockerfile composition or *.yaml file syntax in this article, assuming you already have them. Besides, they both deserve a separate discussion. Now, if you’re deploying using Azure DevOps as I do, you can follow the next steps without changes. If you do use some other CI/CD tools like Jenkins, this approach is still applicable as the steps described are quite generic.
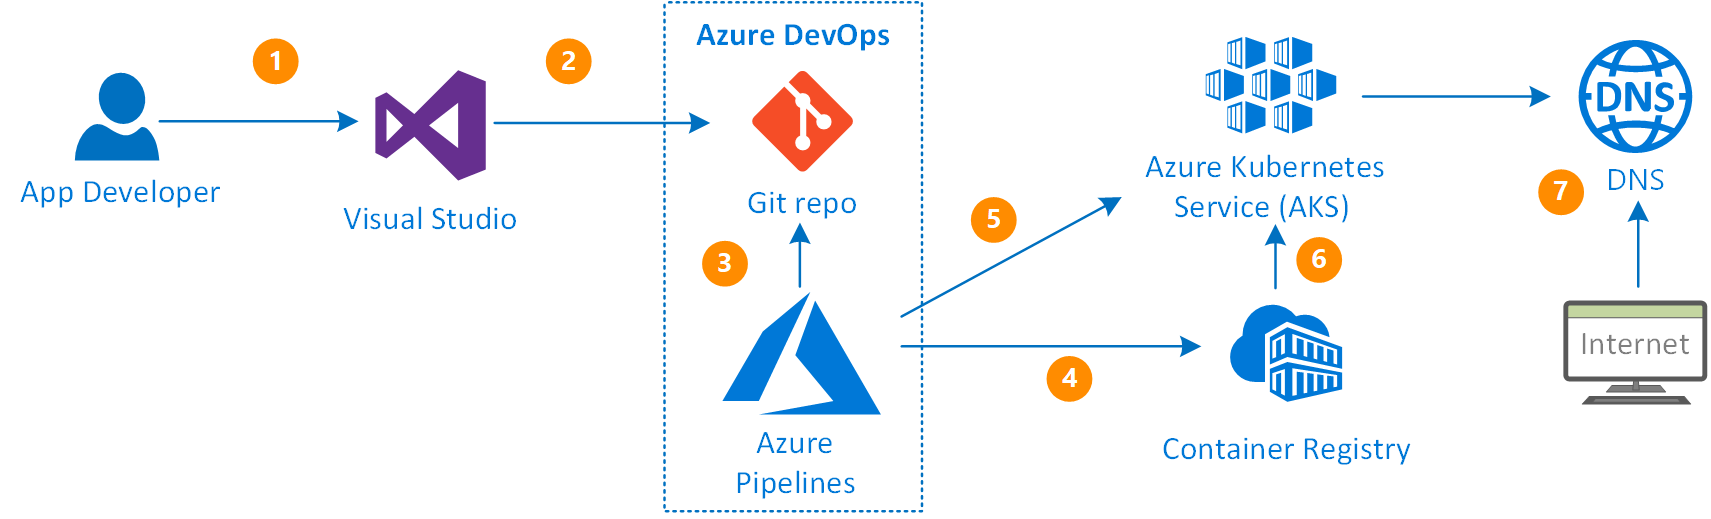
Let’s start with Azure DevOps Pipelines. First, we need to compose our Build pipeline that builds our Docker image and pushes it to the ACR (Azure Container Registry). Then the image will be picked up by the K8s engine during deployment. High-level deployment flow would be the following:
Once the code is committed to Git repository, it triggers the build pipeline
- It builds the container image and pushes it to Container Registry
- Release pipeline deploys the container image into the K8s Pod using the manifest file (*.yaml)
- Once deployed, it has an external IP address it can be accessed with
- Identity Server relies on the SQL Server database, so it must exist before the deployment. It is normally created through EF Core migrations, although, there is a separate process for the database changes Release process I plan to discuss in the next topic
The build pipeline in our case is simple:
Everything it does is image building (according to the Dockerfile spec) and pushing it to the ACR or any other container registry in the next step. The ‘copy’ step only copies the ‘*.yaml’ file to the following Release process.
Ideally, the Release process should be the next:
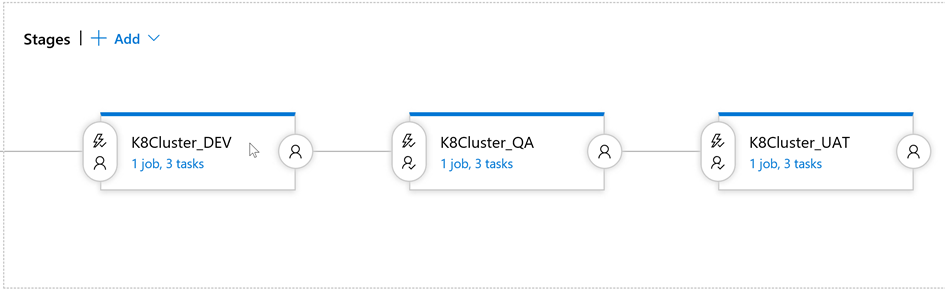
In other words, we have to deploy the same to three different environments after respective approval.
As I explained in the very beginning, every IS4 instance has its own database, and the challenge is to replace the connection string in a way our deployed containers point the right database. Resolution begins with the development technique where we can have multiple configuration files called one after another in .NET Core.
For the beginning, you have to extend your Startup.cs (Configure method in particular):
public static IConfigurationRoot Configuration { get; set; }

public void Configure(IApplicationBuilder app, IHostingEnvironment env, ILoggerFactory loggerFactory)
{
	var builder = new ConfigurationBuilder()
	.SetBasePath(path)
	.AddJsonFile("appsettings.json", optional: true, reloadOnChange: true)
	.AddJsonFile($"secrets/appsettings.{env.EnvironmentName}.json", optional: true, reloadOnChange: true);
	Configuration = builder.Build();
}
Environment name is set in the project properties (ASPNETCORE_ENVIRONMENT) that point to ‘Development’ by default. We will be setting this variable via Pipeline variable in Azure DevOps later on. The next step is to create respective configuration files (we need three of them). According to the mask we set ‘secrets/appsettings.{env.EnvironmentName}.json’, the filenames would be:
- appsettings.dev.json
- appsettings.qa.json
- appsettings.uat.json
Create a directory called ‘secrets’ and put them in there. Make sure these files are not getting sucked into your Git repository as keeping our connection strings to various environments is something we’d like to avoid for the security reasons. For each of these files, I only left the connection string to a database changing the database name according to the environment:

Once this is done, we’re ready for the next step – K8s manifest configuration and Kubernetes secrets. Yes, the best way of keeping the secrets is to use the native tools K8s provide. The choice is to use either Kubernetes secrets or ConfigMaps, and I’d prefer to stick to the first one for security reasons.
The plot is simple:
- When you spin up the new Pod, it mounts the file share contains your secret (*.json file with connection string)
- The app knows the environment it works in (will be taken from the Pipeline variables)
- The app pulls the respective *.json file from the mounted file share (so, for ‘dev’ it would be appsettings.dev.json we prepared before)
NOTE: It is very important to know that in .NET Core app when you add multiple JSON files in the ‘Configure’ method, the latest applied ‘wins.’ It means that if appsettings.json contain connection string and the following appsettings.dev.json contains connection string as well (just like in our config), the .NET app will pick the latter.
Now, we need to push our secrets to Kubernetes cluster. Even though we could push everything to a ‘default’ namespace, let’s create a separate one for every deployment (for the clarity sake). Namespaces, as well as much other stuff in K8s, are provisioned with *.yaml (or JSON) manifests. The one that creates a namespace should look like this:
apiVersion: v1
kind: Namespace
metadata:
  # provide a namespace name
  name: identityserver-dev
  # provide label: DEV/QA/UAT
  labels:
    name: DEV
You can use ‘kubectl’ to provision all three (changing metadata in the *.yaml file):
kubectl apply -f Namespace_create.yaml
Remember, all namespaces must exist before you deploy your configuration or a secret.
Secrets are no different. Deployment is a straightforward procedure as well. Assuming you’ve got a folder structure like this (we created earlier):
/secrets
    appsettings.dev.json
    appsettings.qa.json
    appsettings.uat.json
Use ‘kubectl’ to create them for every namespace we have provisioned (specify a secret name, a file that holds it and the namespace name):
kubectl create secret generic is4-settings-dev --from-file=./appsettings.dev.json --namespace=identityserver-dev
After you’ve done with all three, you can either review them through the K8s dashboard or with respective ‘kubectl’ command:
kubectl describe secrets/is4-settings-dev --namespace=identityserver-dev
The results of the command execution:
Beautiful! We can see that entire file is there just like we asked.
Now the hardest part. We need to ‘explain’ Kubernetes how to mount the file share that holds our secret. This step requires deployment *.yaml update. Add the following to the manifest:
#{ENVIRONEMNT}# variable will be replaced during Release with ‘Replace tokens’ step. By doing this, we specify what environment to use (along with respective secret). According to Dockerfile composition, the root directory for our application is ‘app’, and as configured earlier, the application will be looking for a JSON file in ‘secrets’ directory so that the mount path would be ‘/app/secrets’.
Last but not least, we need to configure our Release pipeline:
The first step replaces tokens in our manifest file using token prefix ‘#{’ and ‘}#’. The next one deploys out Docker image to a highlighted namespace (using ‘apply’ command). If the deployment already exists, we can update it with ‘set’ command. The stem is similar to a previous one, although we change the command to ‘set’ and put the following arguments into the respective field:
image deployments/identityserver identityserver=$(ACR)/identityserver:latest
If you want to draw the parallels with ‘kubectl’, the update command will look like this:
kubectl set image deployments/identityserver identityserver={your ACR}.azurecr.io/identityserver:latest
And finally, our environment variables:
Make sure each variable points to the right scope of execution, i.e. according to our Release flow, ‘dev’ should point to ‘K8Cluster_DEV’ etc. If you have a small screen, scroll right to see the scopes for the variables 😉
Now we all set to run our newly created Build and Release pipelines. For the Build pipeline, you can enable ‘Continuous integration’ trigger, so it triggers Release right after a successful build. Putting the approval process for every environment is a good practice as well.
Troubleshooting
Sometimes the Pods deployed aren’t running even though we use the same image for every environment. The reason could be different: database connectivity, networking etc. To figure what’s going on some of the ‘kubectl’ commands would be useful. At first, you need to get all the pods:
kubectl get pods --all-namespaces
If the malfunctioning pod name is ‘identityserver-5bd859548b-25xyz’ for instance, we can stream the logs right to the console:
kubectl logs -f identityserver-5bd859548b-25xyz -n identityserver-dev
Moreover, you can log in to the pod through the K8s dashboard. Go to the respective Pod and click ‘Exec’ button. It’ll open a command line and let you in inside the Pod. By doing so, you’d be able to review application logs stored in ‘App_Data’ directory (as per Log4net.config in .NET Core project, or whatever you use). The similar command for ‘kubectl’ if you prefer your own terminal/cmd interface:
kubectl exec identityserver-79b996c7f5-zb7hv --namespace identityserver-dev -i -t -- bash
Wrapping up
You can learn Kubernetes for a long time and still didn’t know everything about this beautiful platform. I hope this article helped you to overcome another deployment-related issue you can potentially face Administering the cluster. I deliberately underlined the necessity for both Dev and Ops teams work together as this is how the most complex problems are solved. As demonstrated, for this particular case (and not only) certain Development measures had to be taken for a successful deployment. That’s what I call Development for Operations 😉
Please leave your comments below in case you need some clarity for certain steps, or you’re in stuck doing the similar deployment.